


")


Wall squats are a basic exercise. They’re so basic that all you need is a flat wall. You can do them in the gym, at home, in a hotel room, or almost any walled place. You can make wall squats (more popularly known as wall sits) a test of endurance or a test of strength or some combination of the two. In this comprehensive guide, we’ll walk you through everything you need to know about the wall squat, from correct form and benefits to progression plans and variations. Let’s hit the wall to learn squat about wall squats.
Why Wall Squats?
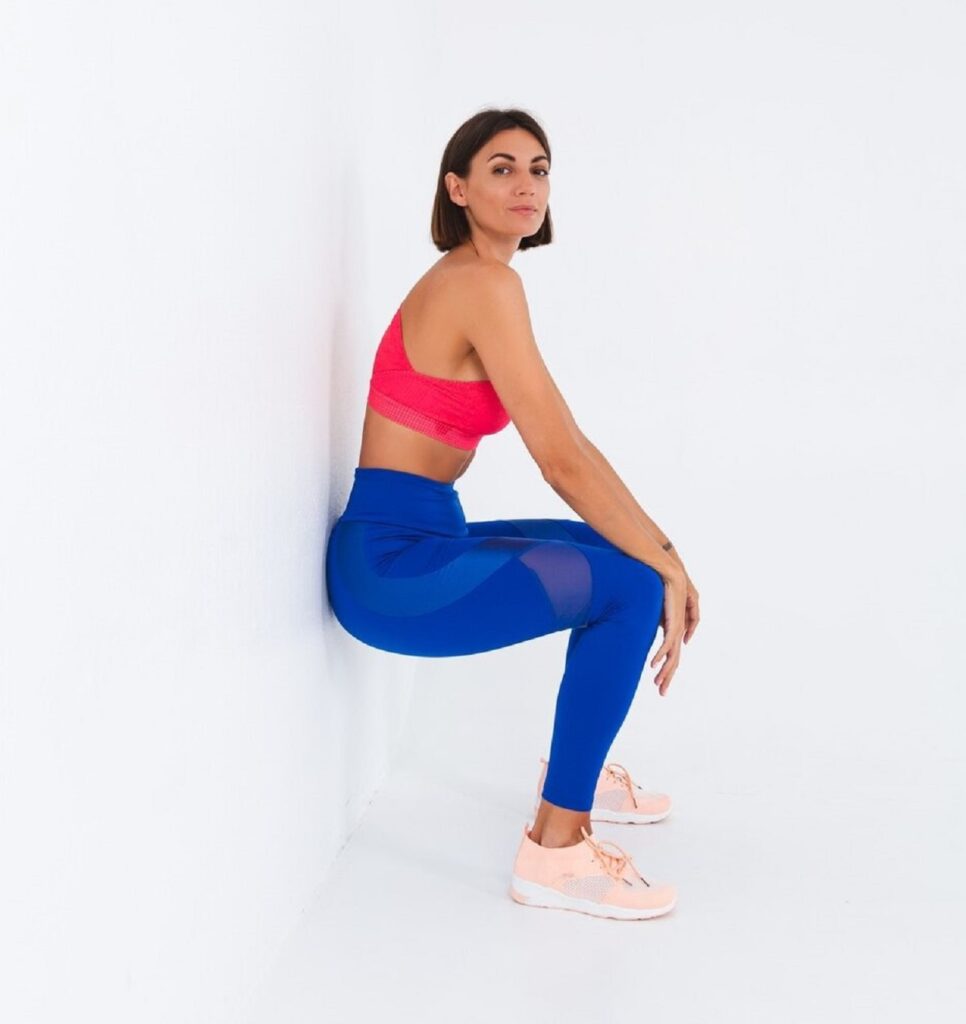
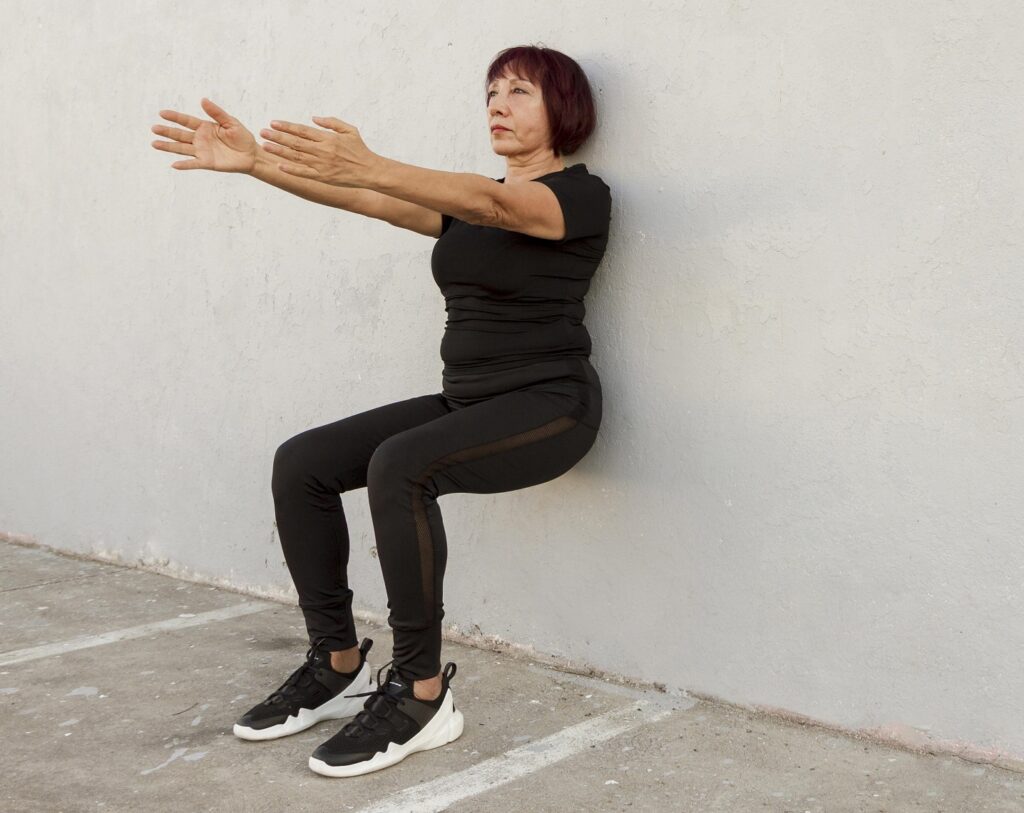
Wall sits are an isometric exercise in which you hold a squat position with your back against a wall. They target the quadriceps, glutes, hamstrings, and core. But they’re more than just a lower-body workout. Because they engage muscles without movement, they’re very low-impact, making them easy on the joints. They can also help you master proper squat technique as you practice keeping your upper body upright in the thighs-parallel-to-floor position. In turn, this can be applied to weighted back squats.
WALL SQUAT WORLD RECORD
In 2008, Dr. Thienna Ho held a wall sit in San Francisco for a world record 11 hours, 51 minutes, and 14 seconds. She also holds the record for most bodyweight sumo squats in an hour: 5135.

Guide to Perfect Wall Squats
1. Set Up Properly.
Stand Against a Wall: Begin by standing with your back flat against a flat, smooth wall. Make sure you’re in an open space without anything blocking your feet.
Position Your Feet: Step your feet about two feet away from the wall, roughly hip-width apart. This distance will vary based on your height (farther if you’re tall, closer if you’re shorter), but it should allow your knees to bend comfortably without jutting forward.
2. Slide Down to Squat Position.
Bend Your Knees: Slowly slide your back down the wall until your knees are bent at about a 90-degree angle. Your thighs should be parallel to the floor, and your knees should align over your ankles.
Check Your Form: Make sure your knees aren’t going past your toes, as this can put unnecessary strain on your knee joints. Adjust your foot positioning if needed to maintain this alignment.
Engage Your Core: Pull your belly button toward your spine to keep your core engaged and protect your lower back.
3. Hold the Position.
Breathe and Focus: With your back firmly against the wall, hold the position and focus on steady breathing. Hold this position for as long as you can while maintaining good form. Start with 15-30 seconds and build up to one to two minutes as your strength and endurance increase.
Maintain Consistency: Keep your back and shoulders pressed against the wall throughout the hold. Your body should form a 90-degree angle at the knees. If you start to slip down the wall, even a little, end the wall sit.
4. Finish.
When you’re ready to finish, push through your heels and slowly slide up the wall until you’re standing straight again. If you’re doing multiple wall sits, give yourself a brief rest before repeating.
Benefits of Wall Squats
1. Strengthens Key Lower Body Muscles.
Wall squats work the quads, glutes, and hamstrings, helping to build strength in the muscles responsible for stability, power, and endurance.
2. Improves Core Stability.
Maintaining a wall squat requires core engagement to keep your spine aligned and back flat against the wall. This can improve your overall stability and protect your lower back.
3. Enhances Muscular Endurance.
By holding the position for an extended period, wall squats help build muscular endurance in the lower body which can improve performance in running, sports, or daily activities.
4. Low-Impact Exercise.
Since wall sits don’t require joint movement, they’re gentle on the knees and hips. This low-impact nature makes them accessible for people recovering from injury or looking to reduce joint strain. It’s also why endurance sitters can go for hours.
5. Easy to Modify and Progress.
Wall squats are highly adaptable for all fitness levels. Beginners can start with shorter holds and lighter intensity, while advanced exercisers can progress by adding weights or single-leg variations.
6. Anywhere, Anytime.
All you need is a wall. While you can do wall sits in a gym, but they’re also a great way to get in a fast workout when you can’t make it to a gym, such as when travelling.
Common Wall Squat Mistakes to Avoid
Letting Knees Move Past Toes
When your knees go too far forward, it places extra pressure on the knee joints. Avoid this by keeping your feet positioned so that your knees stay directly above your ankles.
Arching or Slumping the Back
Make sure to keep your lower back and shoulders flat against the wall to prevent putting strain on your lower back.
Forgetting to Engage the Core
Failing to engage the core can cause instability and lead to poor posture. Keep your abs tight to stabilize the position.
Holding Your Breath
Remember to breathe continuously and deeply throughout the wall sit. Holding your breath can increase blood pressure and make the hold harder than it needs to be.
Starting with Too Long of a Hold
If you’re new to wall squats, it’s better to start with shorter holds and work your way up.
Wall Squat Variations for Progression
1. Single-Leg Wall Squat
Once in the squat position, lift one leg off the ground and extend it forward. Hold for 5-15 seconds, then switch to the other leg. This increases the load on each leg individually and challenges balance.
2. Weighted Wall Squat
Add weights by holding dumbbells, wearing a weight vest, placing a weight plate on your lap, or holding it out in front. Start with lighter weights and gradually increase as your strength improves.
3. Wall Squat with Calf Raise
While holding the squat, lift your heels to balance on the balls of your feet. This adds an extra challenge to your calves and improves ankle stability.
4. Medicine Ball Wall Squat
Hold a medicine ball out in front of you or place it between your knees and squeeze gently. This can improve inner thigh engagement and add a core challenge.

Sample Wall Squat Workout Plan
To incorporate wall squats into your workout routine, follow this progression plan. The goal is to gradually increase your hold time and work up to more advanced variations.
Week 1: Foundation
Sets: 3
Hold: 15-20 seconds
Rest Between Sets: 30 seconds
Week 2: Building Endurance
Sets: 3
Hold: 30-40 seconds
Rest Between Sets: 20 seconds
Week 3: Adding Challenge
Sets: 3
Hold: 45-60 seconds
Rest Between Sets: 15 seconds
Variation: Try adding a single-leg lift for 5-10 seconds per side.
Week 4: Advanced Wall Squats
Sets: 3
Hold: 60-90 seconds
Rest Between Sets: 10 seconds
Variation: Experiment with weighted wall squats or the calf raise variation.
Integrating Wall Squats with Other Exercises
Wall squats make a great addition to any leg or core workout. Consider pairing them with exercises like lunges, deadlifts, and leg raises for a well-rounded lower body session. Here are some sample combos:
Lower Body Strength Circuit
Wall Squat (45 seconds)
Lunges (15 reps per leg)
Glute Bridge (20 reps)
Rest 1 minute, repeat 3 times
Core and Stability Workout
Wall Squat (30 seconds)
Plank (45 seconds)
Side Plank (30 seconds per side)
Rest 1 minute, repeat 3 times
High-Intensity Lower Body Burn Workout
Wall Squat (1 minute)
Jump Squats (15 reps)
Walking Lunge (20 reps)
Rest 1 minute, repeat 2 times
Wall Squats FAQs
How long should I hold a wall squat?
Beginners can aim for 15-30 seconds, while intermediate exercises should go for one to two minutes. Advanced exercisers should be able to do two minutes or more and add weight or one-leg variations. Start small and gradually increase as your endurance improves.
How often should I do wall sits?
You can do wall squats two to three times per week, either alone or as part of weight-training workouts.
What if I feel pain in my knees during wall squats?
If you experience knee pain, double-check your form to ensure your knees are directly above your ankles. You can also try adjusting your foot positioning or reducing the hold time. If pain persists with good form, wall sits aren’t for you.
Wall Squats Conclusion
Wall sits are a versatile, effective, and accessible way to strengthen your lower body and core. With proper form, patience, and a commitment to gradual progression, you can use wall squats to build strength, stability, and endurance. Whether you’re adding them to a leg day workout or using them as a quick at-home exercise, wall sits are a powerful tool for achieving your fitness goals. Incorporate these tips, work up through the progressions, and enjoy the challenge of this simple yet rewarding exercise. Be a wallflower.


